Texas Flying Legends P-51C Restoration Report

Richard Mallory Allnutt (Chief Editor)
Lope's Hope's fuselage as she looked, mated with the engine section, in February, 2016. (photo via AirCorps Aviation)
AirCorps Aircraft Depot

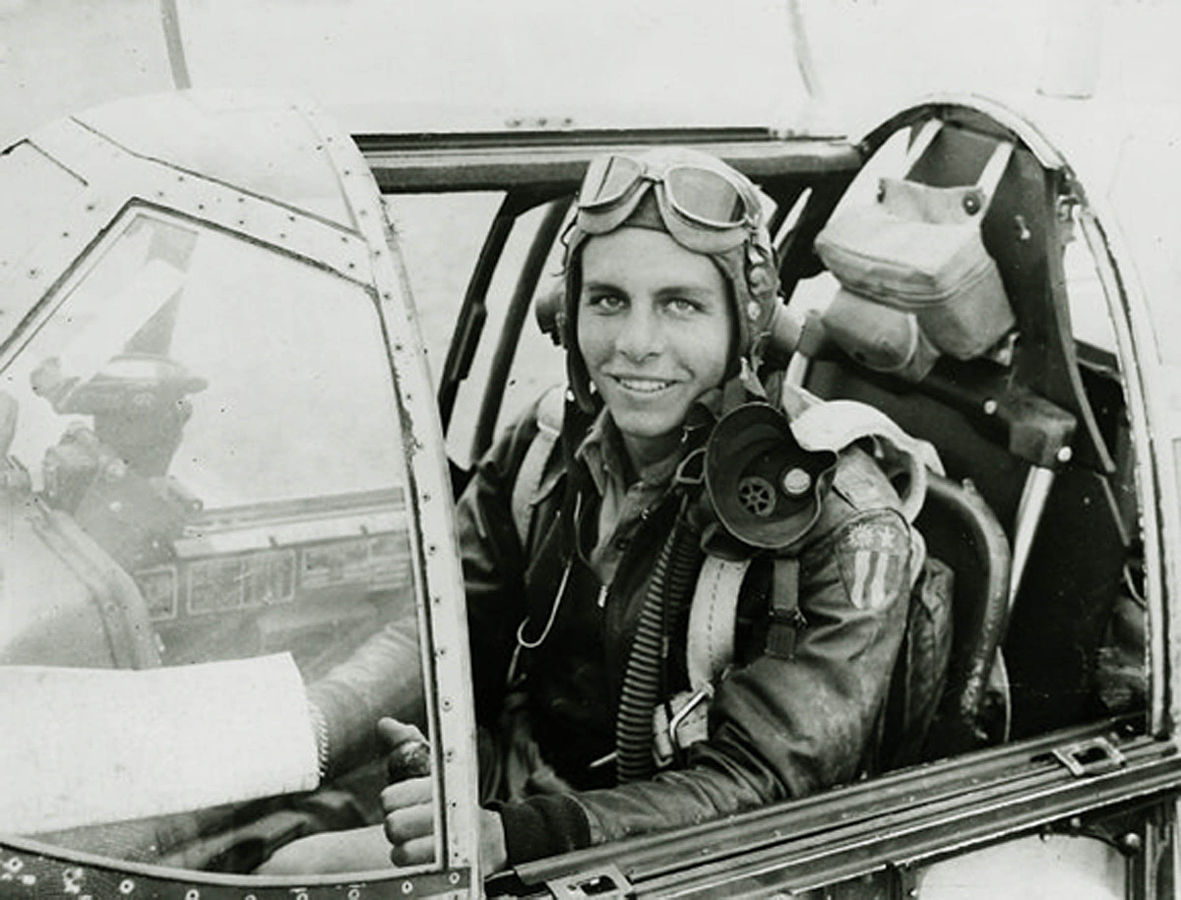
Don Lopez standing in front of his P-51C Mustang "Lope's Hope 3rd" in the CBI during WWII. (photo via AirCorps Aviation)
Don Lopez standing in front of his P-51C Mustang Lope’s Hope 3rd in the CBI during WWII. AirCorps Aviation is in the process of restoring a P-51C to represent this very aircraft. (photo via AirCorps Aviation)

by Richard Mallory Allnutt

Over the past few years, AirCorps Aviation, based in Bemidji, Minnesota has developed an enviable reputation for world-class warbird restorations. This includes combat veteran P-51D Mustangs 44-63675 Sierra Sue II and 44-63864 Twilight Tear, among others. They also recently completed the restoration of the Commemorative Air Force’s P-51C known as Tuskegee Airmen.

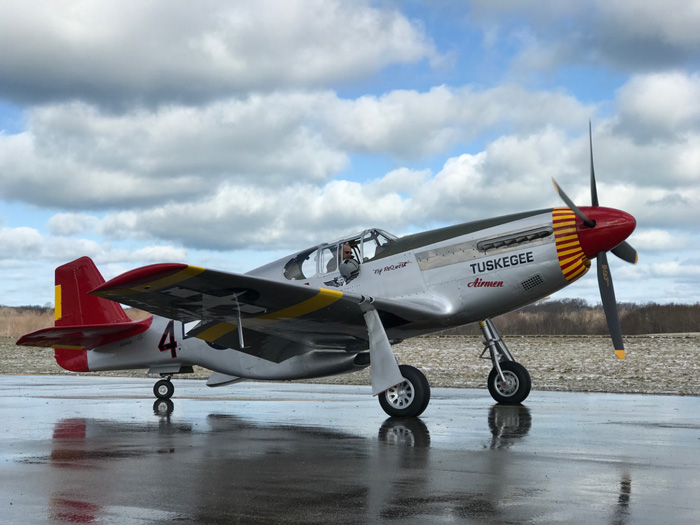
The CAF's P-51C Mustang known as 'Red Tail' shortly before her first flight following restoration at AirCorps Aviation in December, 2016. (photo by Adam Glowaski via AirCorps Aviation)
The CAF’s P-51C Mustang known as Tuskegee Airmen shortly before her first flight following restoration at AirCorps Aviation in December, 2016. (photo by Adam Glowaski via AirCorps Aviation)

AirCorps Aviation is much more than a restoration shop though, having entered several niche markets with exceptional products. This would include their online warbird archive, AirCorps Library, which provides a nearly complete catalog of high resolution drawings for several dozen, mostly American WWII-era military aircraft. For a very reasonable annual fee that any warbird enthusiast could afford, you get access to literally hundreds of thousands of vintage drawings and aircraft manuals in a highly efficient, searchable database. Then there is AirCorps Art, which provides accurate detail artwork from the smallest cockpit decal, to a complete set of warbird markings. And this is nothing compared to their subsidiary, Aeroscan and its retro-engineering capabilities for replicating old parts. By 3D laser scanning an original component, they are able to create a solid model for CAD refabrication. This state of the art technology produces highly accurate results compared to traditional methods saving both time and money.

But we are here today to discuss their ongoing warbird restoration projects. Currently, they are working on P-51C Mustang 43-24907 and a rare, razorback combat veteran P-47D Thunderbolt 42-27609. We will focus on the Mustang in this particular article, with a follow-up on the Thunderbolt in the coming days, after which we will provide regular updates in the same manner we have for Tom Reilly’s XP-82 Twin Mustang restoration project.

The P-51C is almost as rare as the razorback Thunderbolt. Only a handful of high-back Mustangs survived to become warbirds. With the rise in value of WWII aircraft though, once financially prohibitive restorations have become viable and early-model Mustangs have made a resurgence in recent years with several taking flight over the past decade. When completed, this rare example will join the Texas Flying Legends Museum fleet of warbirds dedicated to honoring past generations and inspiring leaders of tomorrow.  The museums prior relationship with the legendary Don Lopez made the decision easy to paint her in colors representing the P-51 he named Lope’s Hope 3rd.

Don Lopez sitting in the cockpit of his P-51 Mustang 'Lope's Hope' while serving in the CBI with the 23rd Fighter Group. (photo via Wikipedia)
Don Lopez sitting in the cockpit of his P-51 Mustang ‘Lope’s Hope’ while serving in the CBI with the 23rd Fighter Group. (photo via Wikipedia)

Lopez became an ace flying P-40s and P-51s in the China Burma India Theatre with the 23rd FG, the Army Air Corps unit which absorbed the American Volunteer Group’s ‘Flying Tigers’. Late in the war, Lopez returned to the USA, serving as a test pilot at Eglin AFB in Florida, where he flew many of America’s early jet fighters. Following an undergraduate degree in aeronautics at the Air Force Institute of Technology, he completed the masters program at Caltech, one of the world’s premier engineering schools. Apollo 8 commander, Frank Borman, was a fellow classmate and regarded him as a brilliant, unflappable engineer. Lopez went on to help establish the nascent aeronautical engineering program at the newly founded US Air Force Academy, and following retirement from the US Air Force, worked on NASA’s Apollo/Saturn V program as well as the Skylab orbital space laboratory. Lopez also became a key figure in establishing the Smithsonian’s National Air & Space Museum on the mall in Washington, DC. He served as its deputy director from the early 1970s until his death in 2008. Having met with Lopez on numerous occasions during his later life, the author can personally attest to his also being one of life’s truly great people. Soft spoken and understated, he was a man of deep intelligence, and a gentleman in every way. For a closer look at his life, please do read the Smithsonian Air & Space Magazine tribute to him HERE.

There is very little public information regarding the history of P-51C Mustang 43-24907. North American built this Mustang at their Dallas, Texas plant as construction number 103-26538. She apparently spent the war Stateside in the training role, but that is where the trail runs dry. Interestingly, Mustangs 43-24905, 24906, 24910 and 24911… just before and just after 24907 on the production line… served with the Tuskegee Airmen in Italy during WWII, so it would be interesting to know more details about this Mustang should they ever come to light.

A screen shot from Joe Baugher's website showing details of the Mustangs immediately around 43-24907 on the production line. Joe's website is a must for all militarily aviation enthusiasts, as it gives details, where known, of just about every airframe to ever serve the US military.
A screen shot from Joe Baugher’s website showing details of the Mustangs immediately around 43-24907 on the production line. Joe’s website is a must for all militarily aviation enthusiasts, as it gives details, where known, of just about every airframe to ever serve the US military.

43-24907 Mustang first appeared on the US civil registry a few years ago, and AirCorps Aviation have had her under restoration since about 2014. From the looks of things, this is a down-to-the-last-rivet restoration with mostly new material. AirCorps Aviation have made rapid progress. We will now show you a brief recap of some of the major work up to now, followed by the most recent restoration report written by AirCorps’s historian, Chuck Cravens.
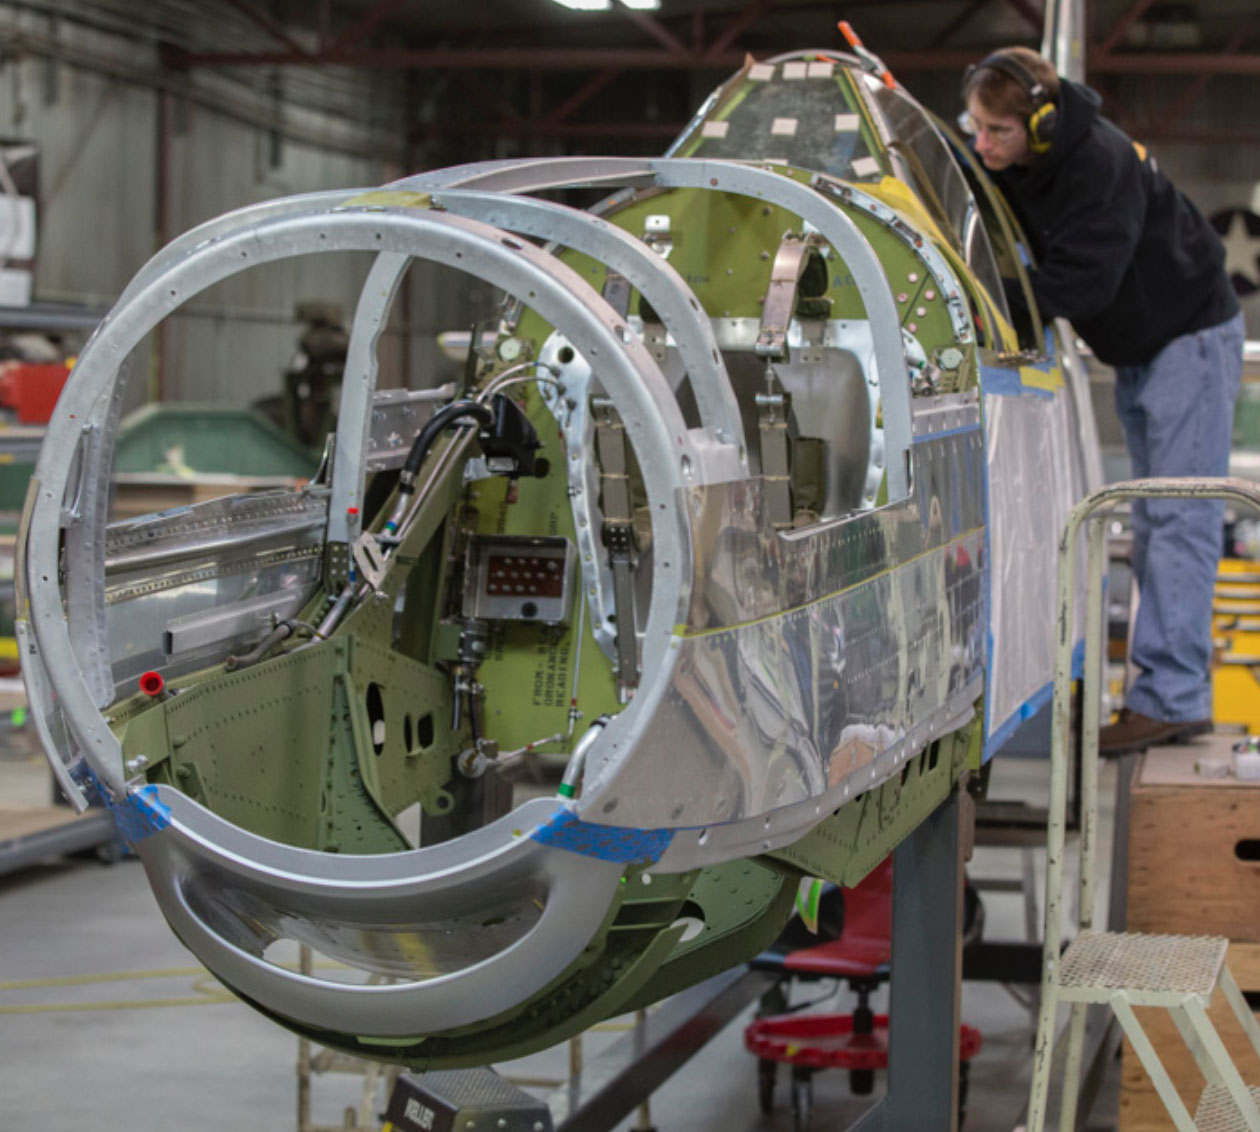
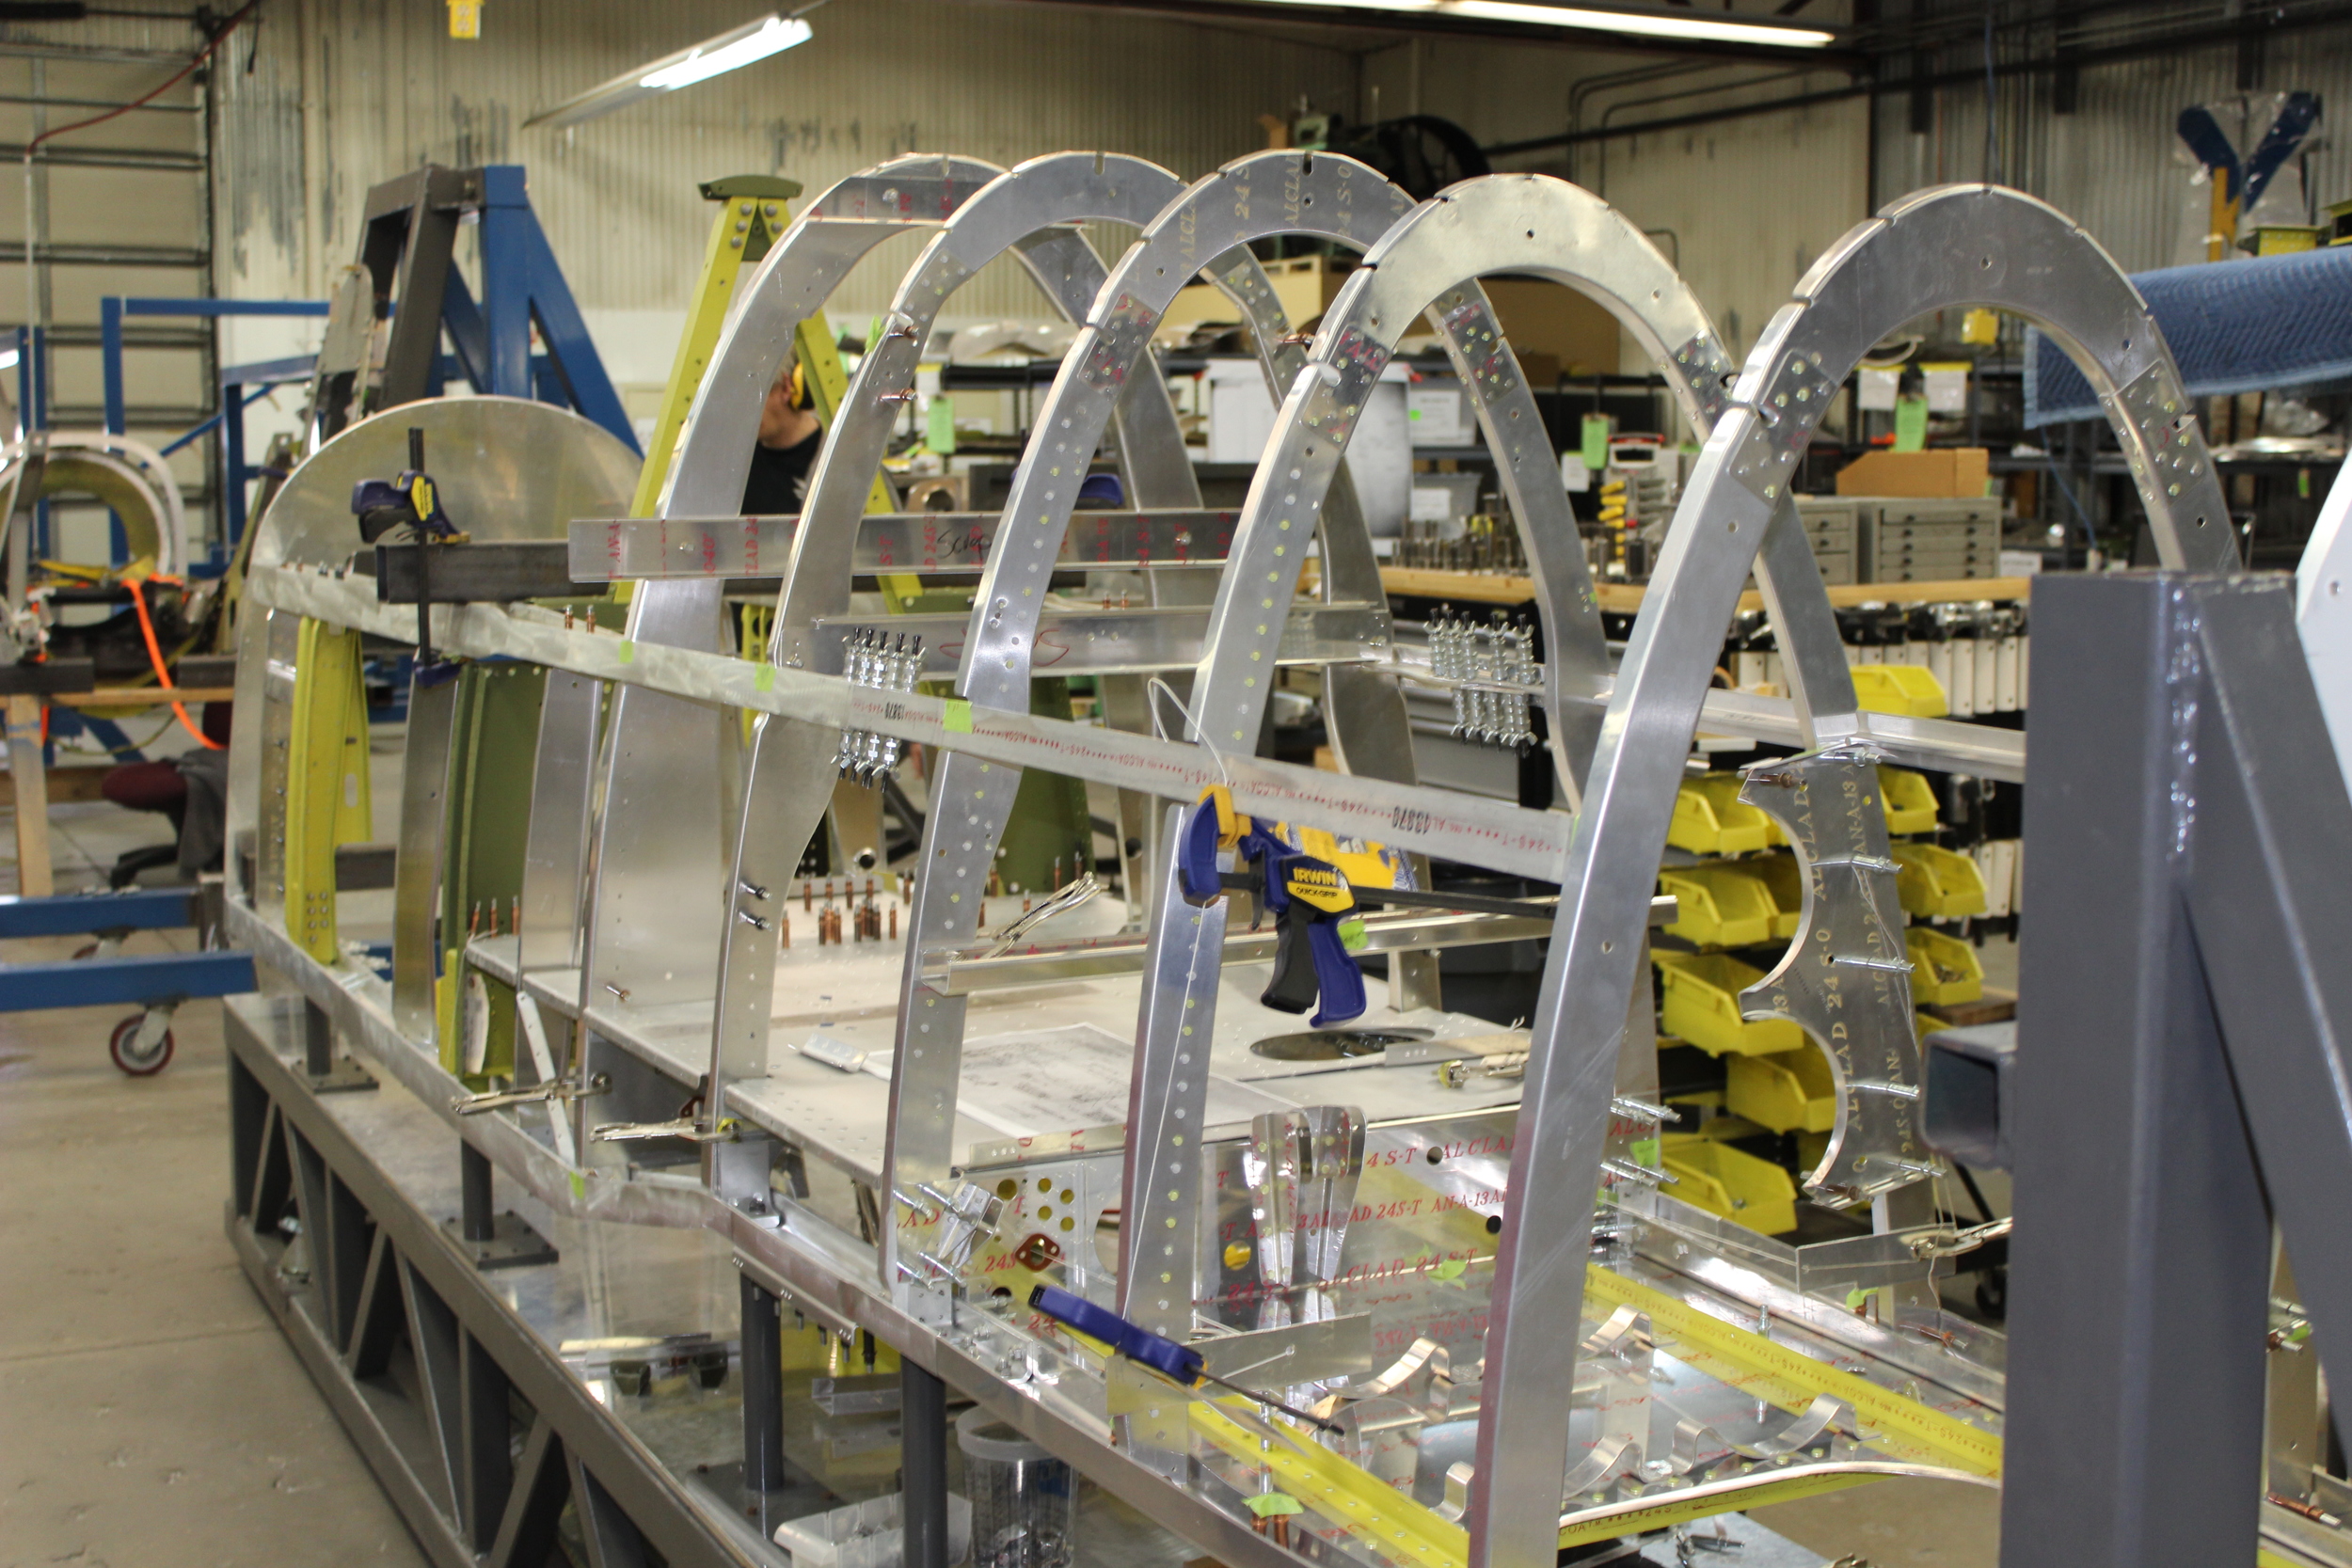
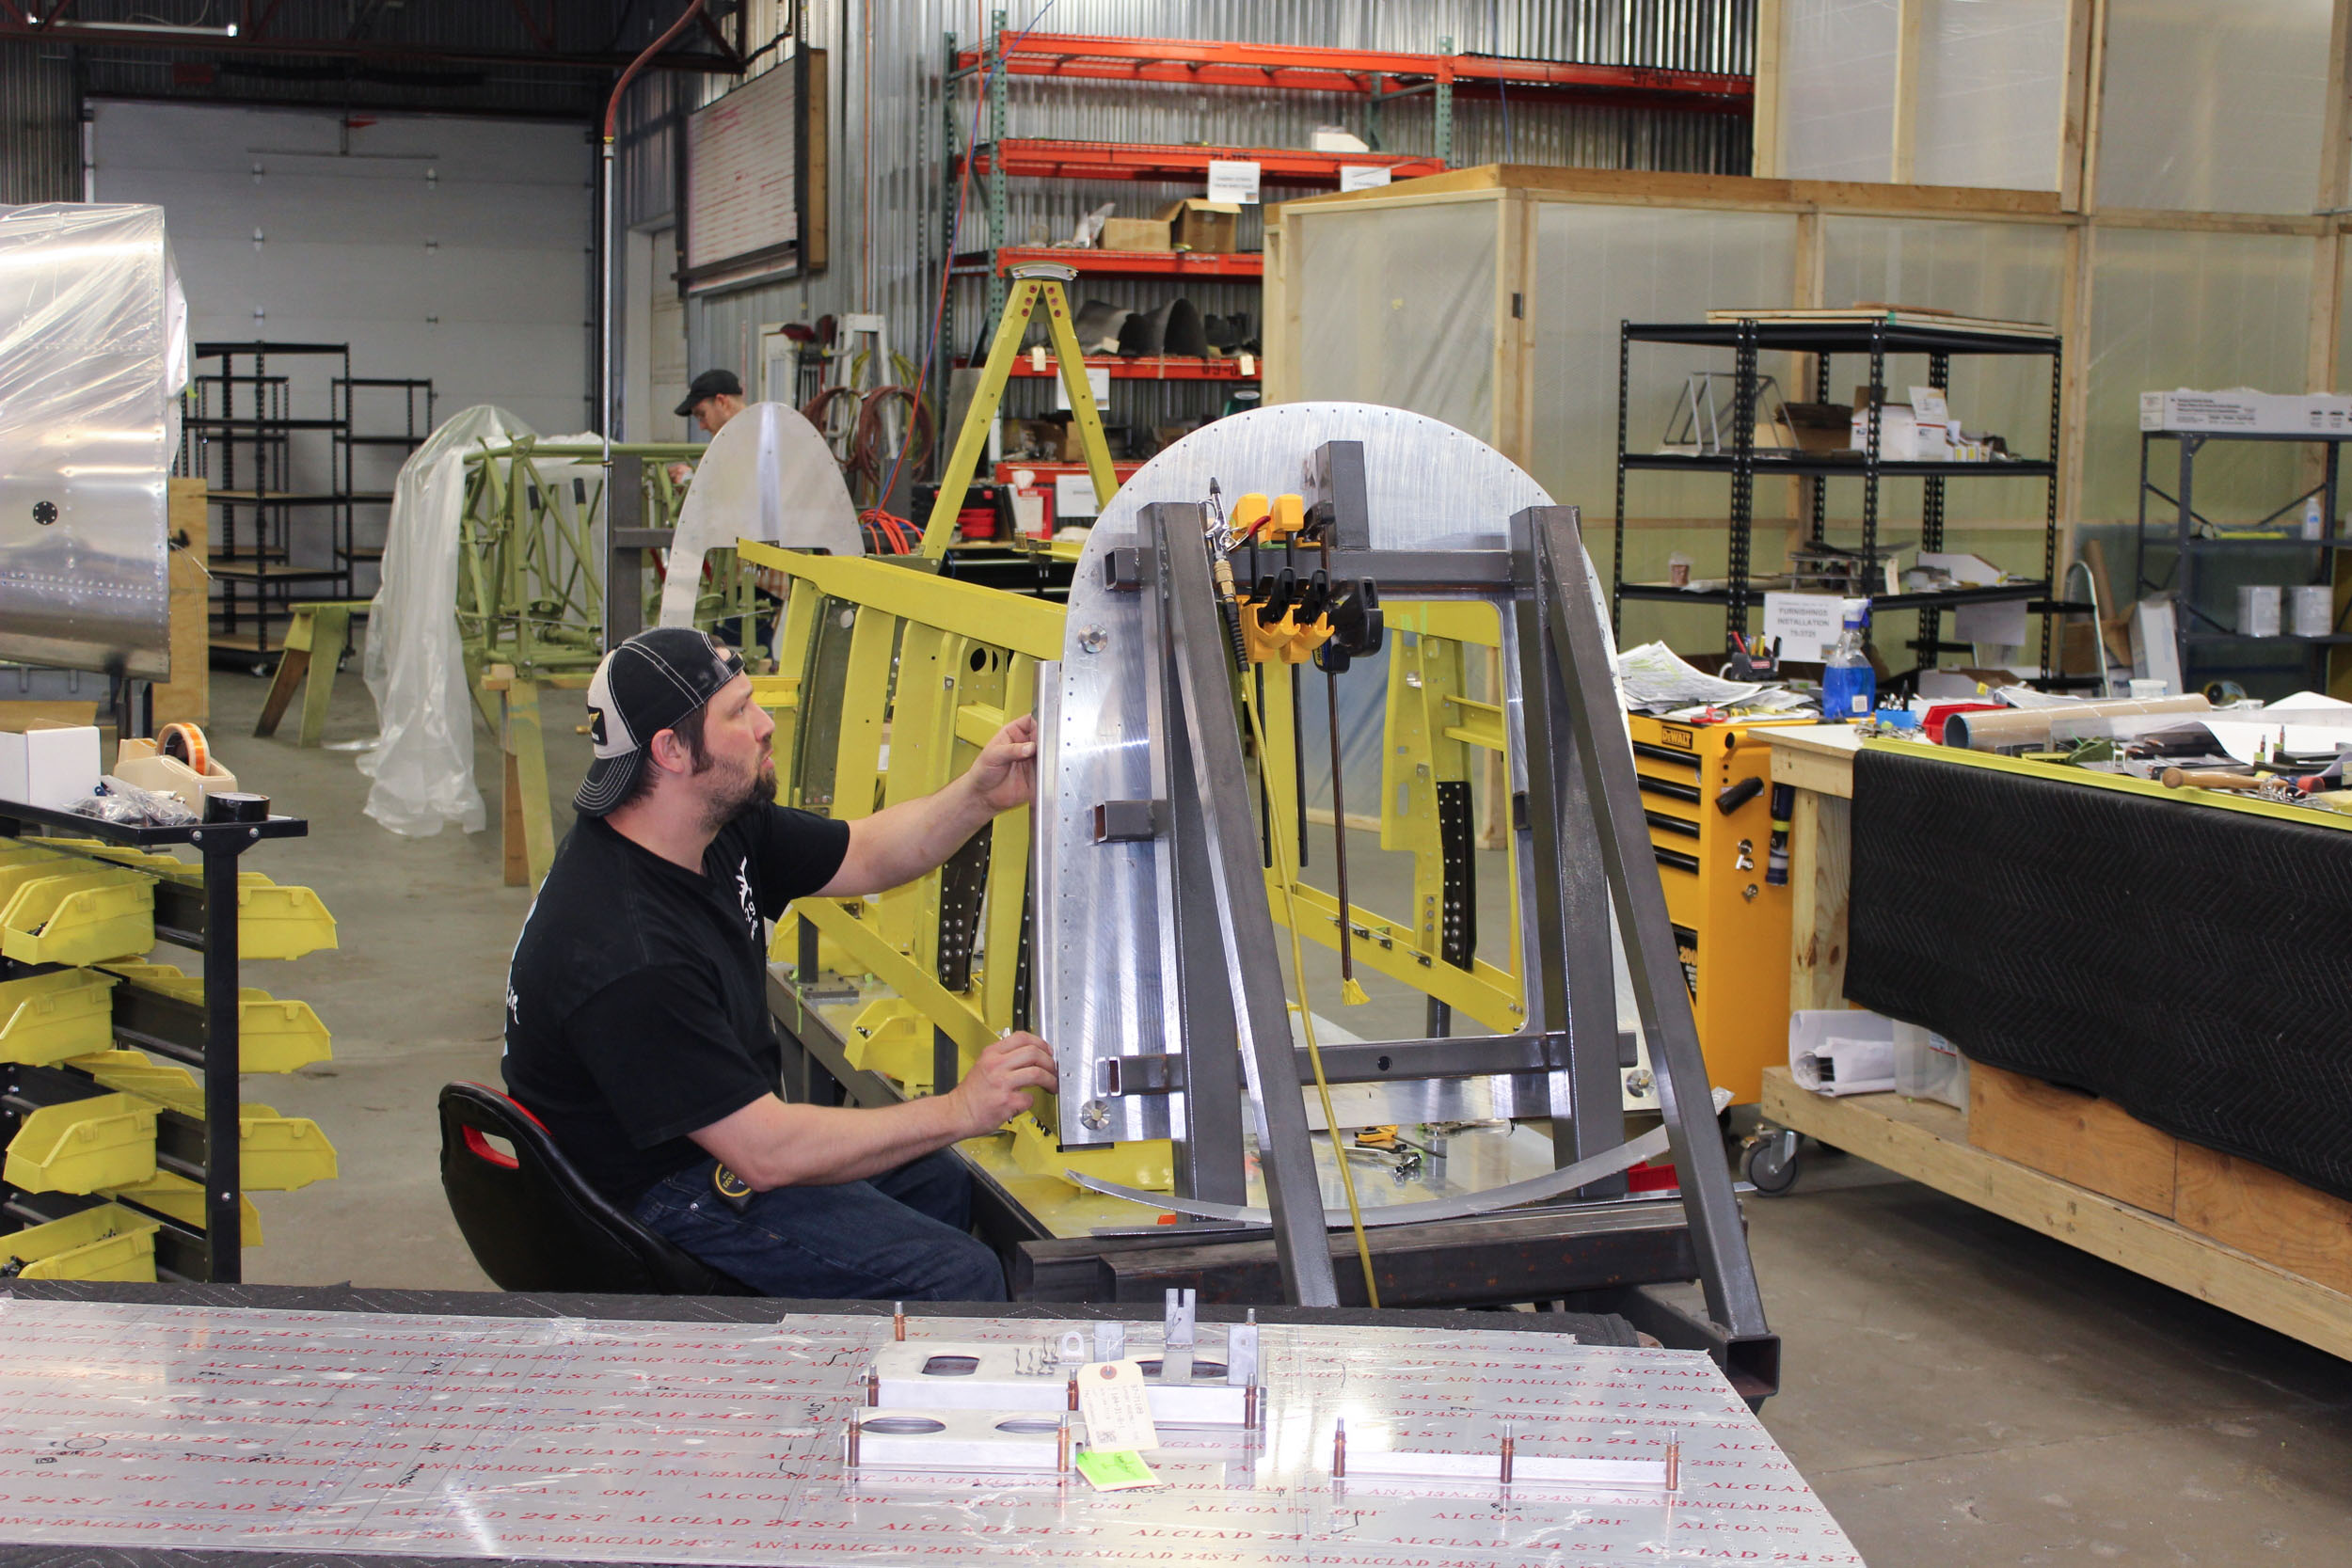
The fuselage coming together in May, 2015. (photo via AirCorps Aviation)

Another shot of the fuselage in its jig during May, 2015. (photo via AirCorps Aviation)

The fuselage as she looked by October, 2015. (photo via AirCorps Aviation)

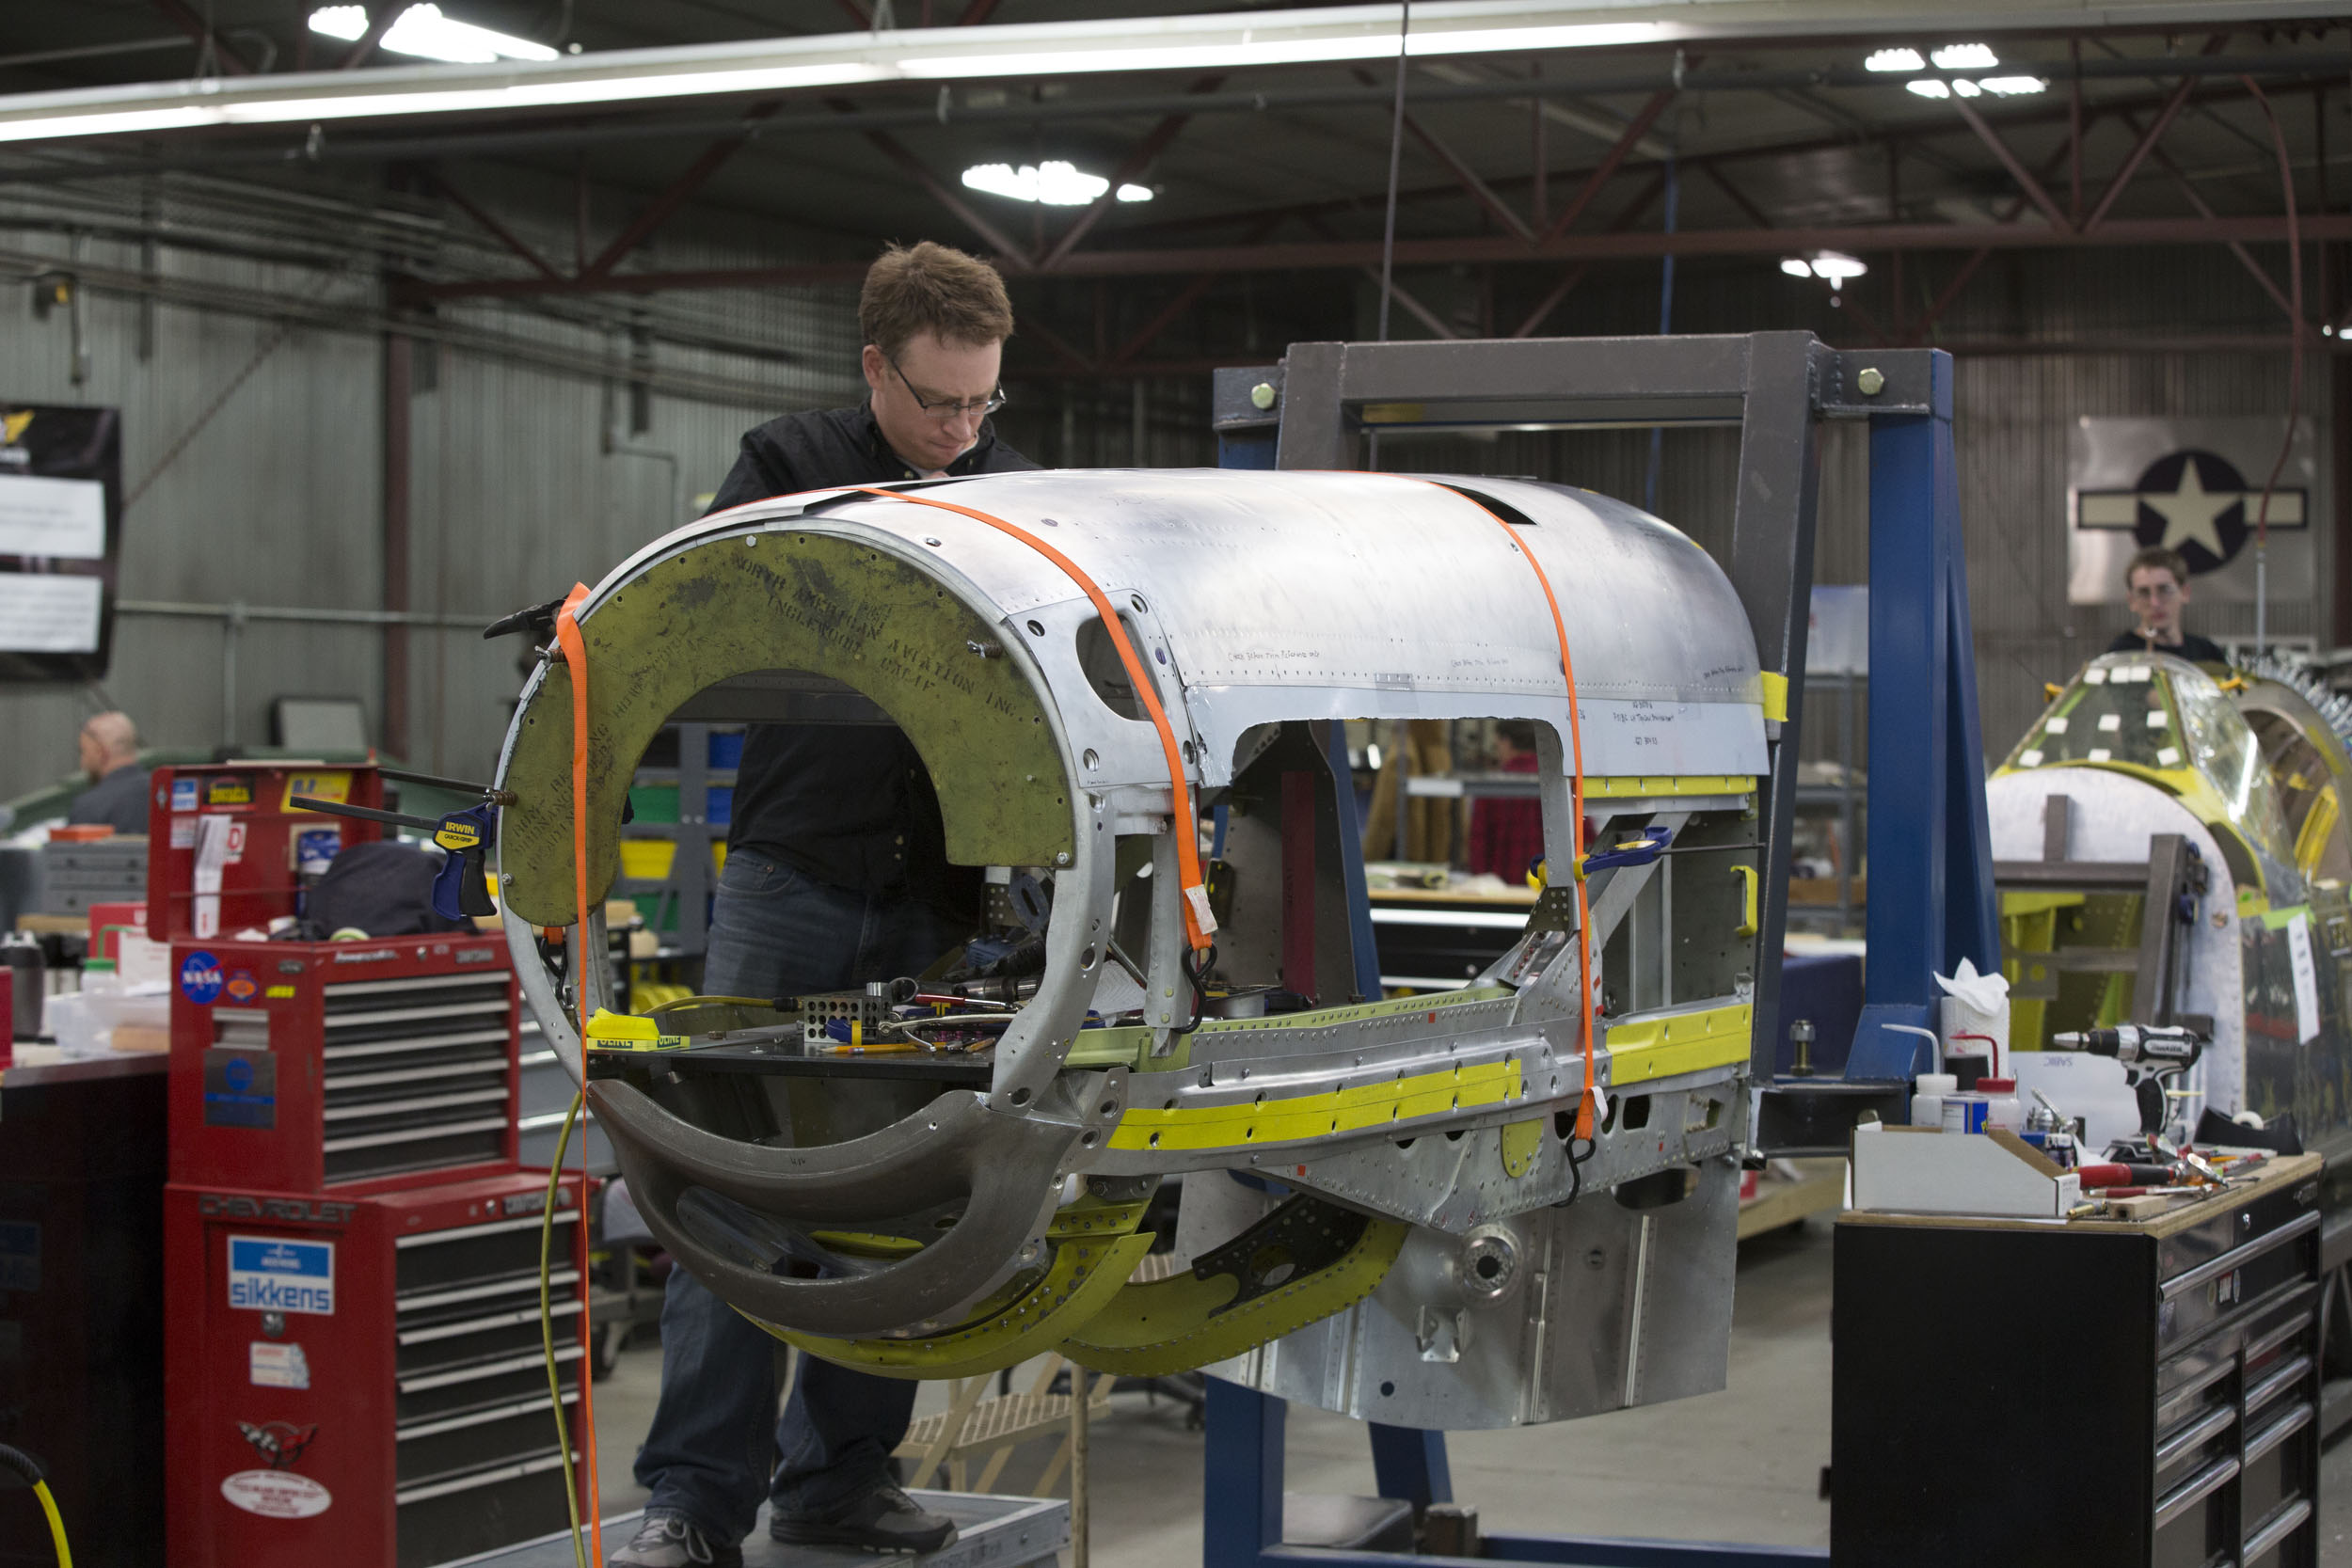
The engine cowlings were also coming together quickly by October 2015. (photo via AirCorps Aviation)
The engine cowlings were also coming together quickly by October 2015. Note the fuselage to the rear right of the shot. (photo via AirCorps Aviation)

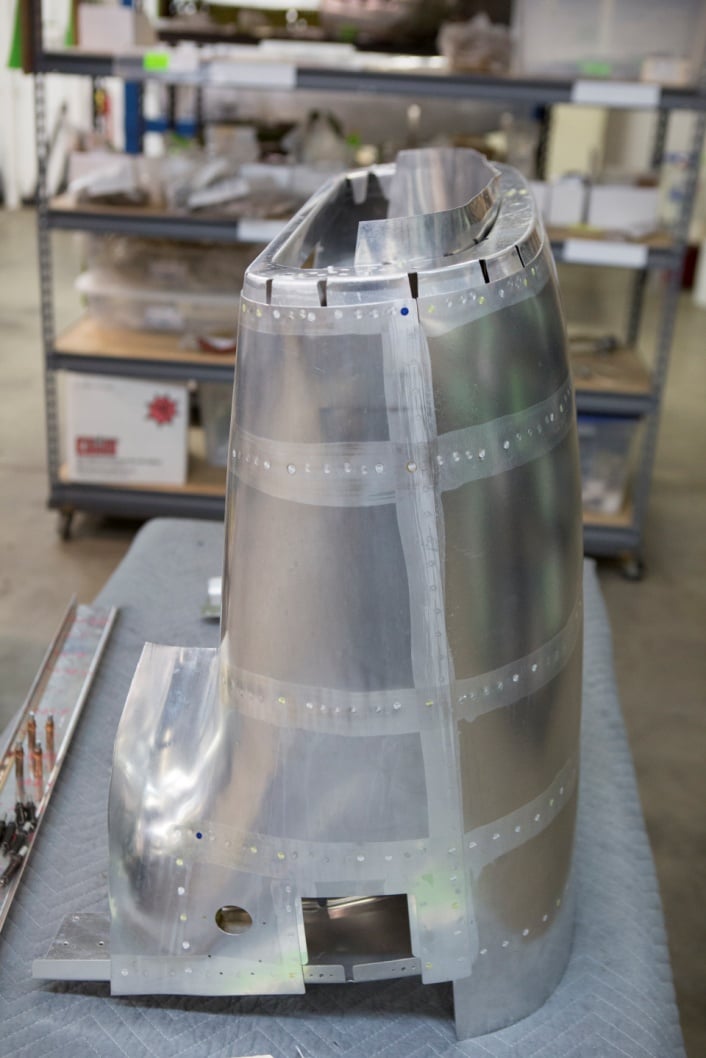
In another photograph from October, 2015 is a shot of the beautiful craftsmanship of the oil cooler air scoop. (photo via AirCorps Aviation)
In another photograph from October, 2015 is a shot depicting the beautiful craftsmanship of the oil cooler air scoop.  Note that a lot of this skin is spot welded, rather than riveted to the formers. (photo via AirCorps Aviation)

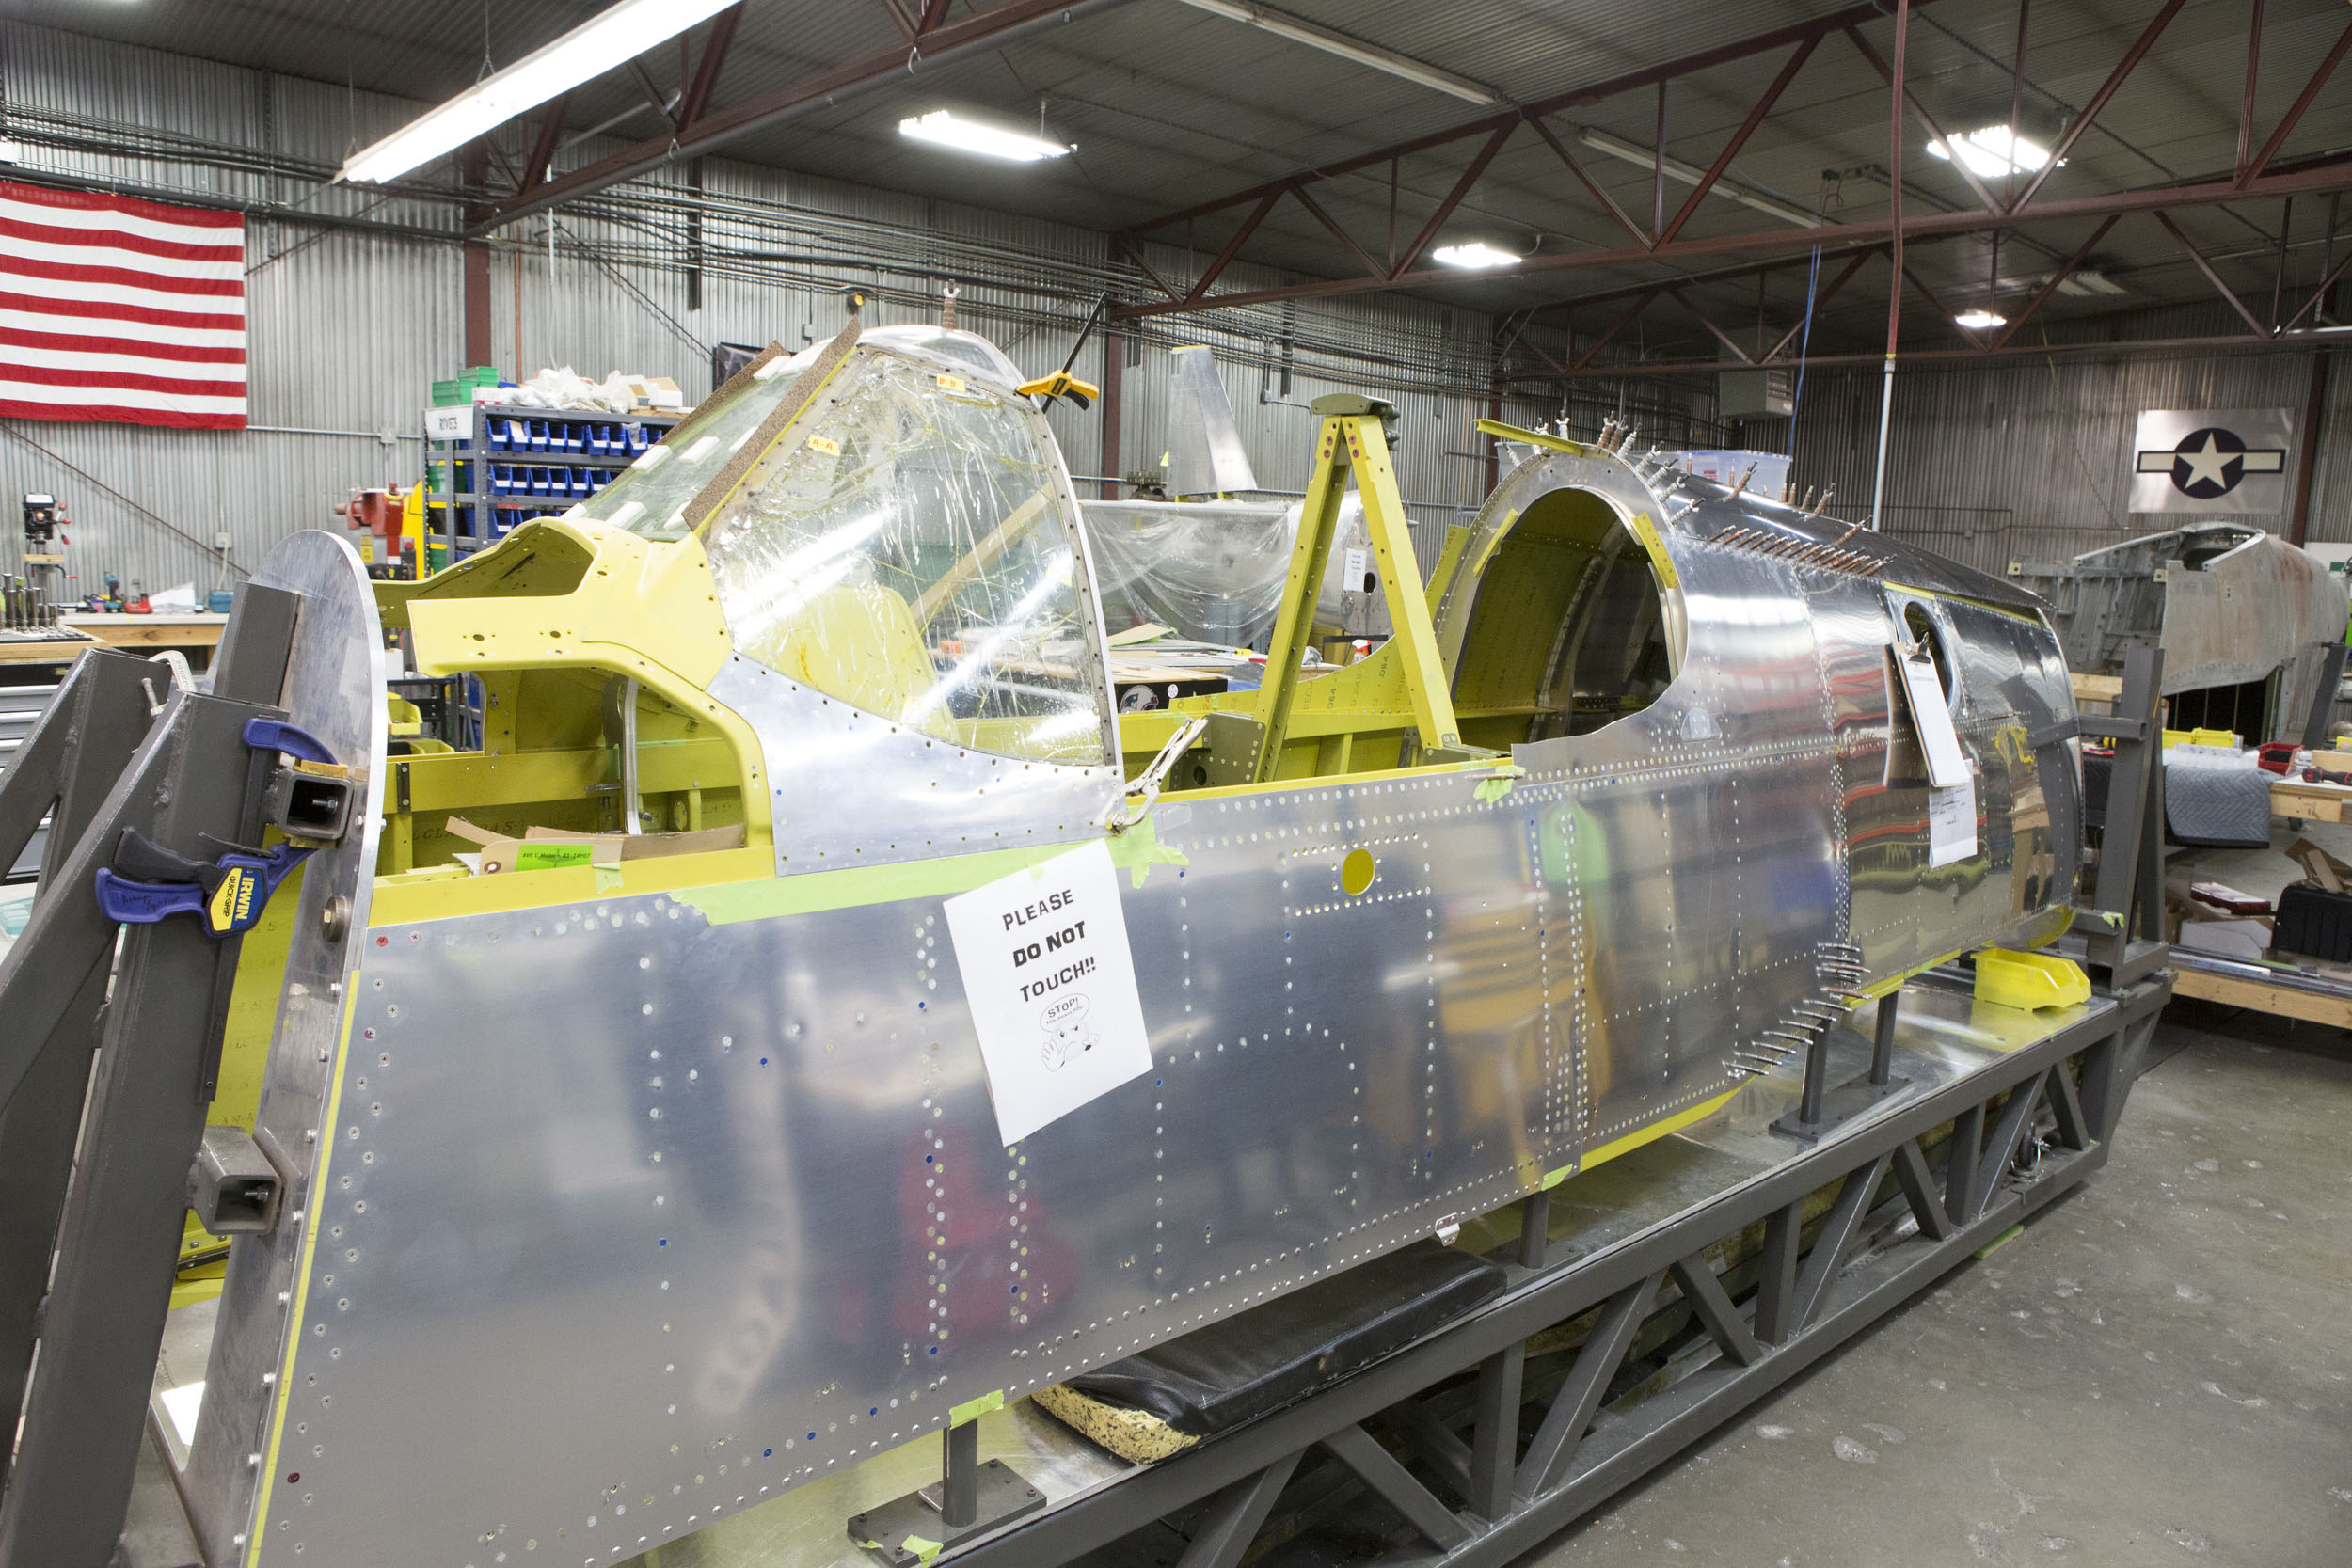
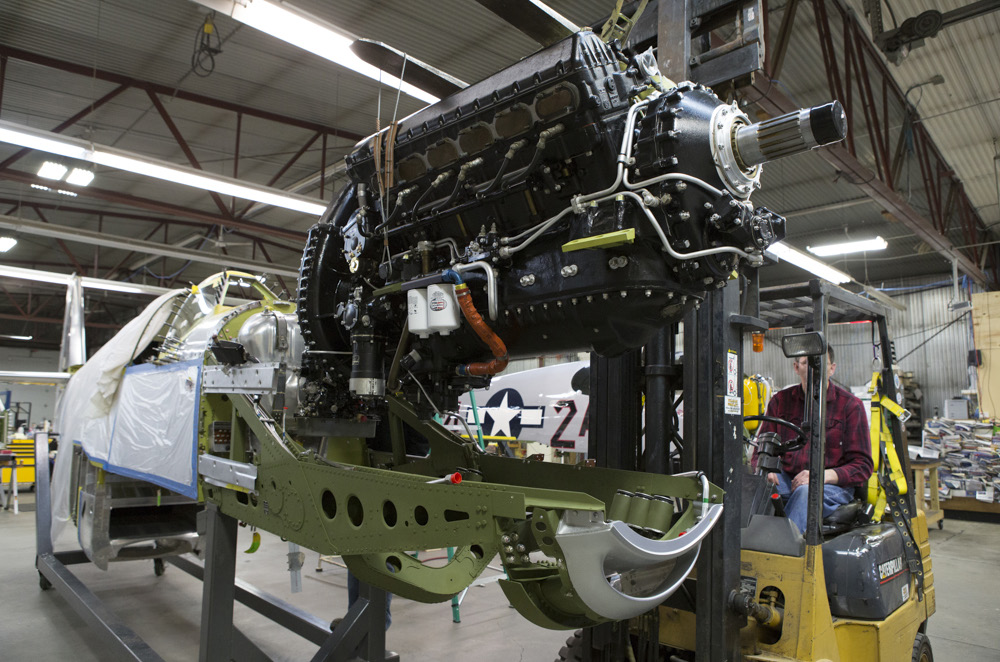
Lope's Hope's fuselage as she looked, mated with the engine section, in February, 2016. (photo via AirCorps Aviation)
Lope’s Hope’s fuselage as she looked, mated with the engine section, in February, 2016. (photo via AirCorps Aviation)

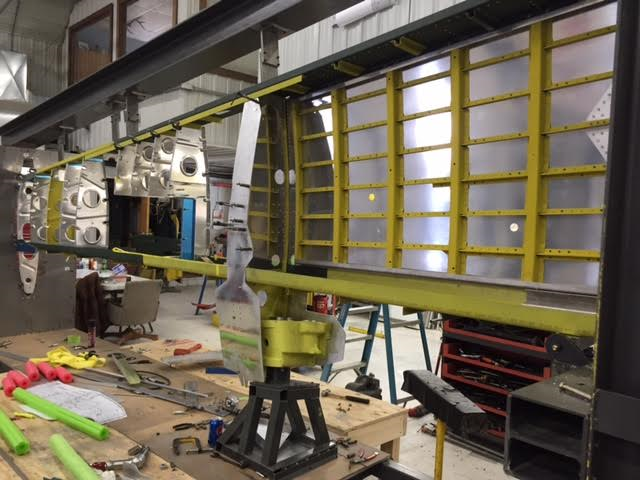
The wing structure coming together in its jig in December, 2015. (photo via AirCorps Aviation)
The wing structure coming together in its jig at Odegaard Wings during December, 2015. (photo via AirCorps Aviation)

The engine going in last spring. (photo via AirCorps Aviation)

The cockpit coming together last summer. (photo via AirCorps Aviation)

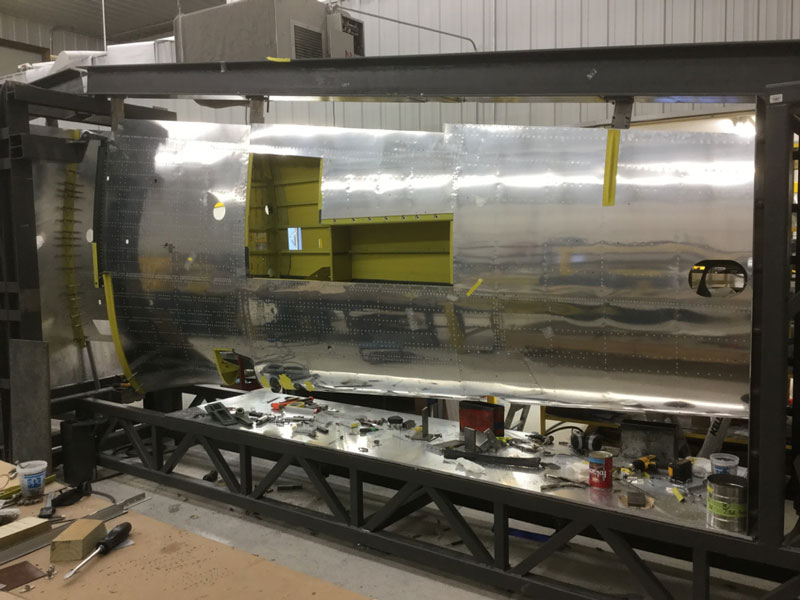
The top side of the port wing as of December, 2016. (photo via AirCorps Aviation)

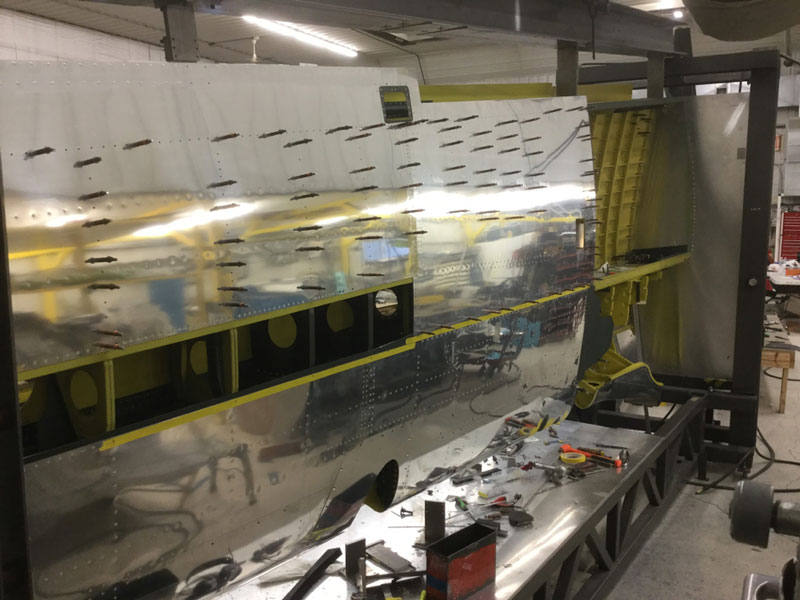
The bottom side of the port wing last December. The starboard wing was in a similar state at that time too. (photo via AirCorps Aviation)

The wheel wells coming together this February. (photo via AirCorps Aviation)

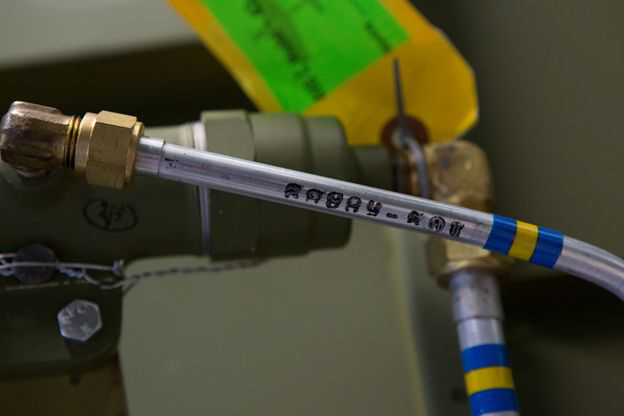
It’s not just the big stuff that’s important though, it’s all of the thousands of tiny details that matter in modern restorations too. One benefit of this level of detail is that you know if the smallest concerns receive intense scrutiny with regards to accuracy,  such as the correct labeling of a hydraulic line, or an inspection stamp… things that almost no one will ever see… then the more essential elements will also be well taken care of too. This is the sort of excellence that AirCorps Aviation is known for.

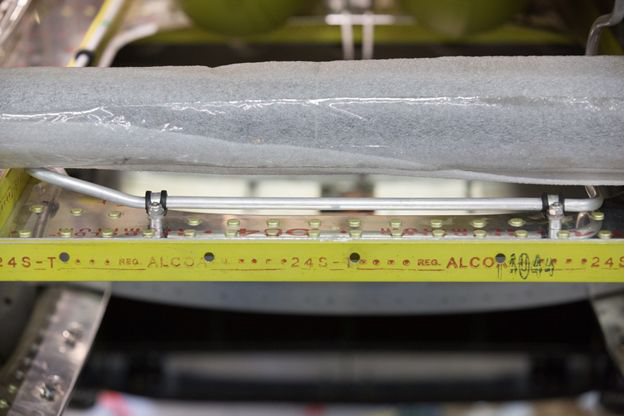
An oxygen line clamped down to one of the structural elements in the rear fuselage. Note the perfectly replicated Alcoa labeling and the inspection stamp. (photo via AirCorps Aviation)

The hydraulic line that leads from the manual emergency hydraulic pump. Note the perfectly replicated color coding and part number on the tubing. (photo via AirCorps Aviation)

The face of the main switch box. It will mount on the bottom center of the main instrument panel. (photo via AirCorps Aviation)


And now for the February/March, 2017 update by Chuck Cravens….

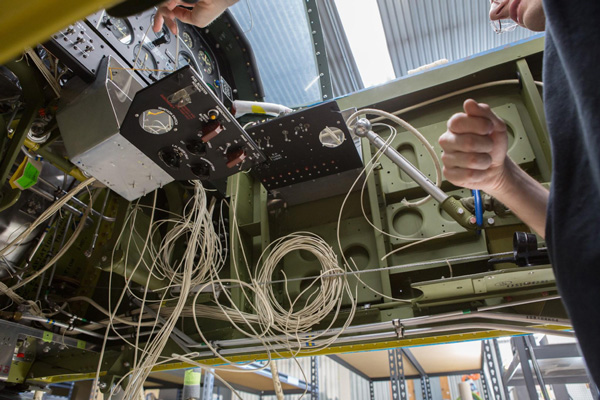
The complex wiring looms going into the cockpit, as seen from below the fuselage. (photo via AirCorps Aviation)

Wiring

The wire used for this restoration is identical to that used for one of AirCorps Aviation’s previous Mustang, Sierra Sue II. Both Mustangs were actually produced the same year, even though the serial numbers begin one year apart. The wiring is described as follows in Chuck Craven’s book on that restoration, Combat Vet P-51, the History of Sierra Sue II, World War Two Survivor:

Properly restoring the wiring in the airframe required duplicating wire used in 1944. The wire used then was insulated with black rubber and wound with cotton string. It was then lacquered and a logo applied. Like anything else, the current generation of available wiring is differently made and labeled. To be as true as possible to 1944, wire with black silicon insulation was custom-made by Allied Wire and cable of Pewaukee, Wisconsin. Ordinary rubber insulation is no longer allowed by FAA speci cations. The custom wire was then wrapped with cotton string like the original stuff by Narragansett Reproductions of Wood River Junction, Rhode Island.

Eric Trueblood at AirCorps Aviation researched the logo right down to the exact font used back then. He located a WWII-vintage Kingsley wire stamping machine, complete with several cases containing different sizes of the correct period type. Different sizes were used on different wire gauges.

 Aaron is looking over the job ahead of him. The yellow object in front of Aaron is a heat gun. (photo via AirCorps Aviation)
Aaron is looking over the job ahead of him. The yellow object in front of Aaron is a heat gun. (photo via AirCorps Aviation)

The view of the right hand side of the cockpit shows the circuit breaker box opened up. (photo via AirCorps Aviation)
The view of the right hand side of the cockpit shows the circuit breaker box opened up. Note: The mask for this box is shown under fabrication later in this article. (photo via AirCorps Aviation)

A similar shot to the previous one, but this time showing the pilot's main switch box opened up as well. (photo via AirCorps Aviation)
A similar shot to the previous one, but this time showing the pilot’s main switch box opened up as well. (photo via AirCorps Aviation)

This tight view lets us see the many connections that have to be neatly and securely made in just these two boxes in order to have a reliable electrical system.(photo via AirCorps Aviation)

The various electrical components need art and graphics work to be accurate. The following set of photographs show the creation of a vinyl mask for properly painting the circuit breaker box cover.

 Max “weeds” or removes the areas that will receive paint from a vinyl mask created to paint the circuit breaker box cover. (photo via AirCorps Aviation)
Max “weeds” or removes the areas that will receive paint from a vinyl mask created to paint the circuit breaker box cover. (photo via AirCorps Aviation)

 Close in you can see how exacting this work can be when creatings small lines of print labels. Max is removing the vinyl from the area of a tiny letter. (photo via AirCorps Aviation)

Close in you can see how exacting this work can be when creatings small lines of print labels. Max is removing the vinyl from the area of a tiny letter. (photo via AirCorps Aviation)

Max has "weeded out" more of the letters so the artwork begins to make sense now... (photo via AirCorps Aviation)
Max has “weeded out” more of the letters so the artwork begins to make sense now… (photo via AirCorps Aviation)

In this case it says “RH FLOUR.” And the word “LIGHT” will be unmasked as well. It stands for “right hand fluorescent light” and is a label on the circuit breaker box cover on the right side of the cockpit. It identifies a rheostat that controls the intensity of ultraviolet cockpit interior lighting.

Landing Gear

Here is a view up through the tail wheel bay. (photo via AirCorps Aviation)

You can see the rudder control cable alongside and above the large tail wheel casting. The two small orange projections from the green casting are Zerk fittings painted orange. North American did this to help crewmen find the fittings and to help avoid missing individual grease fittings as the P-51s were serviced in the field.

Clyde works on the pivot end of the main gear. (photo via AirCorps Aviation)

The main gear are actually the second set AirCorps have overhauled for Lope’s Hope 3rd. The first set were pressed into service when Little Horse, a P-51D also owned by Texas Flying Legends Museum, was being serviced at AirCorps. Inspection showed a crack in the pivot shaft and some wear issues. Little Horse flew out with nicely restored gear that day and left the ones removed from her at AirCorps’ hangar.

Since P-51C and D model main gear are interchangeable and both Mustangs have the same owner, AirCorps Aviation began restoring the former Little Horse gear for Lope’s Hope 3rd.

 Clyde tightens a bolt on the pivot shaft end of the main gear. (photo via AirCorps Aviation)
Clyde tightens a bolt on the pivot shaft end of the main gear. (photo via AirCorps Aviation)

One of the main undercarriage legs temporarily fitted into a wooden support for painting. (photo via AirCorps Aviation)

 Both gear and the scissors linkages, shown just after painting, hang on a rack in the restoration shop. (photo via AirCorps Aviation)
Both gear and the scissors linkages, shown just after painting, hang on a rack in the restoration shop. (photo via AirCorps Aviation)

This image shows detail of the gear fork. (photo via AirCorps Aviation)

Wings

The wings for Lope’s Hope 3rd are nearing completion at Odegaard Wings. The Kindred North Dakota based warbird shop, started by the late and dearly missed Bob Odegaard, is currently filled with P-51 wings, engine mounts, landing gear doors, and Corsair aft fuselage sections.

 Colin has the wing extension panels completed and he is now drilling mounting holes to size. (photo via AirCorps Aviation)
Colin has the wing extension panels completed and he is now drilling mounting holes to size. (photo via AirCorps Aviation)

The wing assembly parts remaining to be finished are: Station 0 rib assembly, the spade doors, and the gun bay ribs installation. When completed, the wings will be removed from the jig and the two halves bolted together. The flaps, ailerons and wing tips will then be fitted.

Once those tasks are completed, the joined wings will be shipped by truck to AirCorps and mated with the fuselage.

 The Station 75 rib has gun mount ttings installed in the right hand wing. Note the carefully replicated 'bleed through' of the original style lettering designating the aluminum alloy and thickness... perfectly replicating what would have been seen on the factory line. (photo via AirCorps Aviation)
The Station 75 rib has gun mount fittings installed in the right hand wing. Note the carefully replicated ‘bleed through’ of the original style lettering designating the aluminum alloy and thickness… perfectly replicating what would have been seen on the factory line. (photo via AirCorps Aviation)


The left side is also tted but needs to be drilled to size and installed. (photo via AirCorps Aviation)
The left side is also fitted but needs to be drilled to size and installed. (photo via AirCorps Aviation)

 The guys are installing the wing fairing nutplates, and the wing attach angles are about 95% installed. (photo via AirCorps Aviation)
The guys are installing the wing fairing nutplates, and the wing attach angles are about 95% installed. (photo via AirCorps Aviation)


And that’s all for this month, please be sure to check back in May for the next installment courtesy of AirCorps Aviation. We wish to thank AirCorps Aviation and Chuck Cravens for their help in providing this article and the accompanying photographs! We will be posting a similar story about the P-47D they have under restoration in the coming week, so watch this space!

Aircorps Art Dec 2019
Share This Article
Richard Mallory Allnutt's aviation passion ignited at the 1974 Farnborough Airshow. Raised in 1970s Britain, he was immersed in WWII aviation lore. Moving to Washington DC, he frequented the Smithsonian’s National Air & Space Museum, meeting aviation legends. After grad school, Richard worked for Lockheed-Martin but stayed devoted to aviation, volunteering at museums and honing his photography skills. In 2013, he became the founding editor of Warbirds News, now Vintage Aviation News. With around 800 articles written, he focuses on supporting grassroots aviation groups. Richard values the connections made in the aviation community and is proud to help grow Vintage Aviation News.
Leave a comment

Leave a Reply

Your email address will not be published. Required fields are marked *